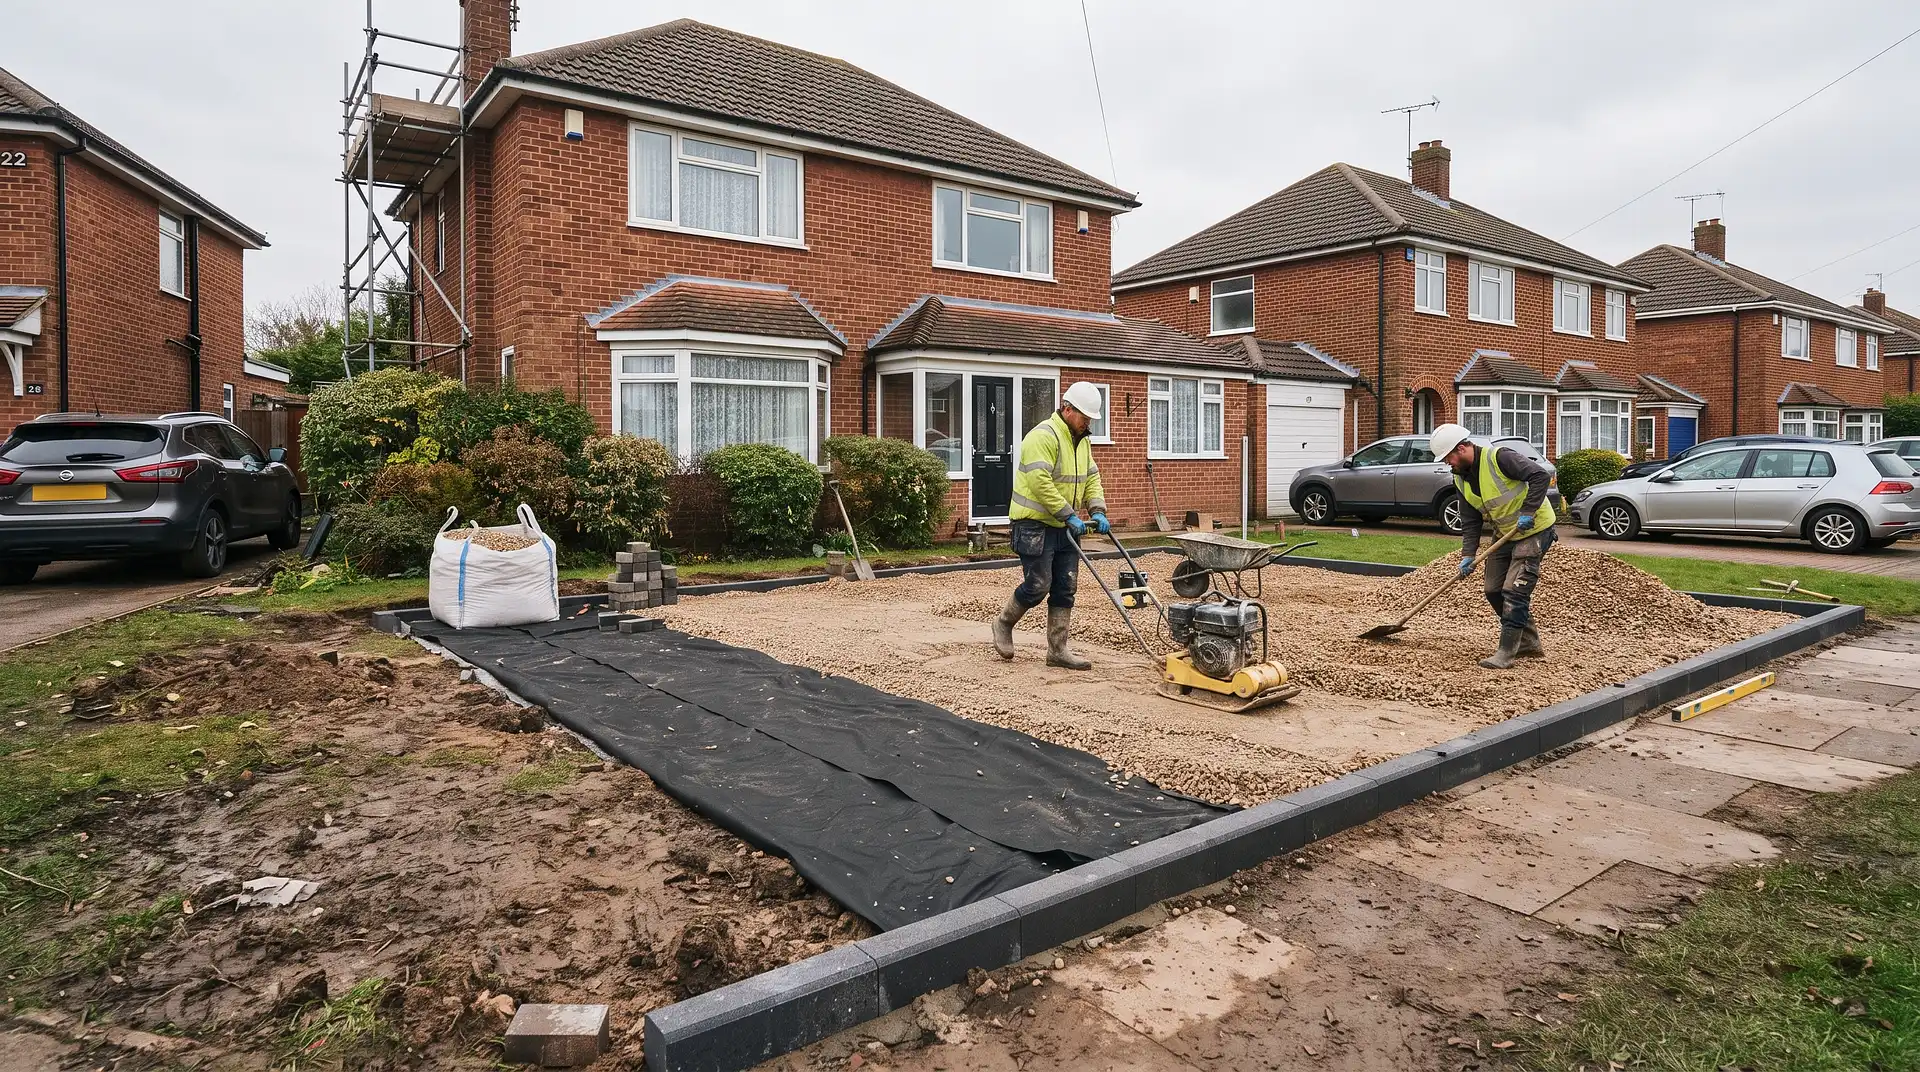
How to Construct a Gravel Driveway
1 October 2026
To construct a gravel driveway, excavate the area to firm ground, install edge restraints, lay a suitable geotextile membrane and build a well-compacted stone sub-base. Finish with approximately 40mm to 50mm of angular driveway gravel. The sub-base carries the vehicles, while the decorative gravel provides the finished surface.
Quick answer: A typical domestic gravel driveway may require around 200mm to 250mm of total excavation, including approximately 150mm of compacted sub-base and 40mm to 50mm of angular gravel. The exact depth depends on the soil, vehicle weight, drainage and whether a gravel stabilisation grid is used. Compact the sub-base in separate layers rather than placing it all at once.
What layers does a gravel driveway need?
A durable gravel driveway is a layered construction. Spreading decorative gravel directly over soil will normally lead to sinking, weeds, mud and deep tyre tracks.
Layer | Typical domestic specification | Purpose |
|---|---|---|
Natural ground | Excavated to firm and stable soil | Supports the complete construction |
Separation geotextile | Heavy-duty permeable membrane where required | Stops the stone sub-base mixing with soft soil |
Stone sub-base | Often around 150mm after compaction | Spreads vehicle loads and creates a firm foundation |
Upper membrane or gravel grid | Product and site dependent | Separates layers or holds gravel in position |
Decorative gravel | Approximately 40mm to 50mm deep | Creates the finished driving surface |
These depths are common benchmarks for domestic cars. Weak clay, made ground, poor drainage or regular use by vans can require a deeper or specially designed construction.
Plan the driveway before excavating
Measure the available area and decide where vehicles will enter, turn and park. A typical single parking space is approximately 5 metres long and 2.5 to 3 metres wide, but more room is helpful where doors must open beside a wall or boundary.
Your plan should identify:
the driveway length and width;
the finished surface level;
the direction rainwater will travel;
the location of edging and entrance restraints;
any inspection covers or utility chambers;
underground electricity, gas, water and drainage services;
access for excavation and material deliveries;
whether a dropped kerb is required;
whether stabilisation grids are needed.
Do not begin digging until underground services have been identified. Service drawings, cable-detection equipment and professional locating may be required.
Choose the right gravel
Use hard, angular gravel intended for vehicle traffic. The sharp edges lock together more effectively than smooth, rounded stones.
A particle size of approximately 14mm to 20mm is commonly used for domestic driveways. Gravel that is too small can become trapped in tyre treads, while very large stone can be uncomfortable to walk on.
Avoid using rounded pea shingle as the main driving surface. Its smooth stones roll against each other, creating movement, ruts and material spreading onto the pavement.
Popular gravel options
Angular granite: durable and available in grey, pink and mixed colours.
Limestone chippings: widely available with a pale or grey appearance.
Basalt gravel: dark, hard-wearing stone suited to modern properties.
Flint gravel: offers mixed natural colours but should be angular enough for driveway use.
Recycled aggregate: may suit the sub-base, provided it meets the required specification.
Ask the supplier to confirm that the chosen stone is suitable for a driveway rather than a decorative garden border.
What sub-base should you use?
The sub-base is more important than the decorative gravel. It spreads the vehicle load and helps prevent the ground from sinking or moving.
MOT Type 1 is widely used for standard driveway construction. It contains crushed stone ranging from fine particles to larger pieces. When correctly compacted, these different sizes lock together to create a dense, stable layer.
A typical domestic gravel driveway may use approximately 150mm of compacted sub-base. It should normally be installed in two or three thinner layers, with each layer compacted before the next is added.
Do not assume that MOT Type 1 creates a completely free-draining construction. If the driveway must allow water to soak vertically through every layer, the drainage design may require an open-graded sub-base such as a correctly specified Type 3 material or another permeable system.
The correct aggregate depends on the ground, drainage route and local requirements. Get professional advice where the soil is weak or water collects on the site.
How to construct a gravel driveway step by step
Step 1: Mark out the area
Use pegs and string lines to mark the driveway’s edges. Check the width at several points and mark curves carefully.
Measure from fixed features such as walls, gates and the house rather than relying only on existing lawn or border edges. Confirm that the finished driveway will provide enough space to manoeuvre safely.
Step 2: Set the finished levels
Use string lines, a spirit level, laser level or surveying equipment to establish the finished surface height.
The driveway should normally fall away from the building. Avoid directing water towards the house, a neighbour’s property or the public pavement.
Keep the completed surface safely below the property’s damp-proof course. A common benchmark is at least 150mm below the damp-proof course, although entrances, accessible thresholds and existing building details may need a site-specific solution.
Step 3: Excavate the driveway
Remove turf, topsoil, roots and soft material. A total excavation depth of around 200mm to 250mm is common for a domestic gravel driveway with a 150mm sub-base and 40mm to 50mm surface layer.
The required excavation can be deeper where:
the soil is soft or wet;
the ground contains made-up material;
heavy vehicles will use the driveway;
a capping layer is required;
the site needs additional drainage;
existing unsuitable material must be removed.
Excavate to firm ground rather than stopping at a fixed measurement while weak soil remains.
Step 4: Shape and compact the formation
The exposed ground at the bottom of the excavation is called the formation. Remove soft spots, organic material and standing water.
Shape it to the required falls and compact it where suitable. Soft areas may need further excavation and replacement with approved fill.
A driveway laid over an unstable formation can sink even when the upper layers appear thick enough.
Step 5: Install the lower geotextile
Lay a strong, permeable geotextile over the prepared soil where separation is needed. It prevents fine soil particles from moving into the stone sub-base and weakening it.
Overlap adjoining membrane sections according to the manufacturer’s instructions. Extend the material to the driveway edges and avoid puncturing it unnecessarily.
A geotextile is not a substitute for the sub-base. It separates the materials but does not carry the vehicle load by itself.
Step 6: Install firm edge restraints
Gravel needs a physical boundary to stop it spreading into lawns, borders and pavements. Suitable edge restraints include:
concrete kerbs;
block-paving setts;
natural stone edging;
steel landscape edging rated for vehicle areas;
heavy-duty recycled plastic edging designed for driveways.
The entrance requires particular attention because braking and turning tyres push gravel towards the road. A line of setts or a firm threshold across the entrance helps contain the loose stone.
Timber edging can be used in some situations, but it usually has a shorter service life than concrete, stone or metal.
Step 7: Add the sub-base in layers
Spread the sub-base evenly rather than tipping the full depth into one area. For a 150mm compacted layer, install it in several layers of approximately 50mm to 75mm.
Compact each layer using a suitable vibrating plate compactor before adding the next one. Work across the driveway in overlapping passes and pay attention to edges and corners.
Do not judge compaction only by appearance. Loose aggregate can look level before settling under the first vehicles.
Step 8: Check levels and drainage
After compaction, check the surface with a straightedge and level. Correct high and low areas before installing the decorative layer.
The sub-base should be smooth, firm and free from deep tyre or boot impressions. Confirm that the designed fall carries water away from buildings.
Step 9: Fit a gravel grid if required
Gravel stabilisation grids are interlocking panels with cells that hold the decorative stone. They can reduce rutting and movement, particularly where:
vehicles turn in a small area;
the driveway has an incline;
pushchairs or wheelchairs need a firmer surface;
the same wheel tracks are used every day;
gravel migration would affect a pavement or drain.
Install the grid over the base and bedding arrangement specified by its manufacturer. Different systems have different requirements for bedding material, membrane position and gravel size.
Do not place a lightweight garden grid in an area carrying vehicles. Use a product with a suitable load rating.
Step 10: Spread the decorative gravel
Tip the gravel into small piles across the driveway and spread it evenly with a rake. Aim for a finished loose-gravel depth of approximately 40mm to 50mm unless the grid manufacturer specifies another amount.
Too little gravel can expose the membrane, grid or sub-base. Too much makes the surface difficult to walk and drive on because vehicle tyres sink and push the stones into ridges.
Keep the gravel slightly below the top of the edging so it remains contained.
Step 11: Rake and inspect the surface
Rake the gravel into an even layer and check the transition to the pavement, road, garage and paths. Remove any loose stone that has moved beyond the driveway boundary.
Drive over the completed surface slowly, then inspect the wheel tracks. Add or redistribute gravel where the layer appears thin.
Calculate Your Gravel Driveway Cost
Enter the driveway size, existing surface and location to receive a regional UK estimate.
How much gravel do you need?
Measure the driveway’s length and width in metres:
Length × width = area in square metres
Multiply the area by the gravel depth in metres:
Area × depth = gravel volume in cubic metres
Example for a single driveway
A driveway measuring 6 metres by 3 metres has an area of 18 square metres:
6m × 3m = 18m²
For a 50mm gravel layer, convert 50mm to 0.05 metres:
18m² × 0.05m = 0.9m³
The example requires approximately 0.9 cubic metres of gravel before allowing for settlement or waste. Ask the supplier to convert this volume into tonnes using the bulk density of the chosen stone.
Add approximately 5% to 10% for uneven areas, settlement and future topping up. Do not use one universal tonnes-per-cubic-metre figure because different aggregates have different densities.
How much sub-base do you need?
Use the same volume calculation for the sub-base. For an 18m² driveway with a compacted sub-base depth of 150mm:
18m² × 0.15m = 2.7m³ compacted volume
Loose aggregate reduces in volume when compacted. Tell the supplier the required compacted volume so the order includes an appropriate compaction allowance.
Does a gravel driveway need a membrane?
A separation geotextile is generally useful between the natural soil and stone sub-base. It reduces the movement of fine soil into the foundation and helps the layers remain distinct.
An additional upper membrane may be used between the compacted sub-base and loose gravel, depending on the selected construction and grid system. It can reduce mixing and discourage weeds growing from below.
However, weeds can still establish in dust, leaves and soil that collect between the stones. A membrane does not make a gravel driveway maintenance-free.
Every membrane must be permeable if water is expected to pass through it. Do not install an ordinary plastic sheet, as this can trap water within the construction.
Does a gravel driveway need drainage?
Loose gravel is normally permeable, but the complete driveway only drains properly if the layers below it can accept or direct the water.
Clay soil, a dense sub-base or a high water table can prevent water soaking away, even when the decorative surface is gravel. The driveway may need:
a permeable open-graded sub-base;
a fall towards a lawn or planted border;
a drainage channel;
a soakaway within the property;
a project-specific drainage design.
Do not direct driveway water onto the public pavement, road or a neighbouring property.
Planning permission for a gravel driveway
In England, a new or replacement front driveway generally does not require planning permission when it uses a permeable surface such as correctly constructed gravel, or when water is directed to a lawn, border or another permeable area within the property.
An impermeable front driveway covering more than 5m² may require planning permission if water is not directed to a suitable permeable area.
Separate permission may be needed for a dropped kerb, work affecting a listed building, changes within a conservation area or access onto a classified road. Rules differ across the UK, so check with the local authority before starting.
How much does a gravel driveway cost?
InstantCost’s 2026 UK driveway calculator places a professionally supplied and fitted gravel driveway at approximately £55 per square metre. This includes typical VAT and groundwork, but the final amount changes with excavation, access, ground condition and the existing surface.
Item | Typical InstantCost figure |
|---|---|
Gravel driveway supplied and fitted | Approximately £55 per m² |
Single driveway, approximately 18m² | Approximately £990 at the base rate |
Double driveway, approximately 36m² | Approximately £1,980 at the base rate |
Drainage or soakaway | Approximately £850 extra |
Decorative edging or kerb | Approximately £380 extra |
Driveway lighting | Approximately £650 extra |
The size calculations above apply the £55 per square metre starting figure. Difficult excavation, waste removal, weak ground, grids, premium gravel, restricted machinery access and regional labour rates can increase the quotation.
A gravel driveway typically lasts around 10 to 15 years before substantial refreshing may be needed. Regular raking and occasional gravel top-ups help preserve its appearance.
If you are comparing gravel with other materials, InstantCost’s guide to how much it costs to pave a driveway explains the prices and lifespans of block paving, tarmac, concrete, resin and stone.
How to maintain a gravel driveway
A gravel driveway needs more regular attention than a solid paved surface. Basic maintenance includes:
raking stones back into wheel tracks;
removing leaves before they break down into soil;
pulling weeds before their roots spread;
cleaning gravel from the pavement and road;
checking edging for movement;
topping up thin areas with matching stone;
repairing sub-base depressions rather than hiding them with extra gravel.
If a depression keeps returning, remove the surface gravel, rebuild and compact the affected foundation, then replace the gravel. Simply filling a deep rut with loose stone rarely provides a lasting repair.
Common gravel driveway construction mistakes
Spreading gravel directly over soil: Vehicles will push the stones into the ground and create muddy ruts.
Using a shallow sub-base: The driveway can sink or move under regular vehicle loads.
Compacting the full depth at once: Thick loose layers do not compact evenly. Install and compact the sub-base in stages.
Using rounded pea shingle: Smooth stones move too easily beneath tyres and feet.
Applying too much surface gravel: A deep loose layer makes steering, walking and wheelchair movement difficult.
Forgetting the entrance restraint: Braking and turning vehicles can spread gravel onto the pavement or road.
Ignoring the finished level: A surface installed too close to the damp-proof course can increase damp and splashback risk.
Assuming gravel guarantees drainage: Water cannot soak away if the ground and sub-base underneath are impermeable.
Using plastic sheet as a membrane: An impermeable sheet can trap water beneath the gravel.
Ignoring underground services: Excavation can damage pipes and cables hidden below the proposed driveway.
Driveway construction and safety guidance
Stay safe: Locate underground services before excavating. Wear eye, hearing, hand and foot protection when using breakers, compactors or cutting equipment. Keep children and pedestrians away from open excavations, machinery and material piles.
Driveway construction must also manage surface water correctly. Review the government’s permeable front-garden surfacing guidance and confirm local planning, drainage and dropped-kerb requirements before work begins.
Plate compactors, mini excavators and loaded wheelbarrows can cause serious injury. Use hired machinery only if you understand its controls and safe operating procedure. Arrange professional construction when excavation is deep, access is close to the public pavement or ground conditions are uncertain.
Frequently asked questions
How deep should a gravel driveway be?
A typical domestic construction may be around 200mm to 250mm deep in total, including approximately 150mm of compacted sub-base and 40mm to 50mm of decorative gravel. Weak ground or heavy vehicle use can require greater depth.
Can you lay gravel directly on soil?
No. Gravel placed directly on soil will normally sink, spread and mix with mud. A driveway needs a stable, compacted stone sub-base and suitable geotextile separation.
What size gravel is best for a driveway?
Angular gravel around 14mm to 20mm is commonly used because it locks together better than small or rounded stone. Confirm that the chosen aggregate is sold for vehicle areas.
Do I need MOT Type 1 under a gravel driveway?
MOT Type 1 is commonly used for a strong compacted foundation. However, a fully permeable design may require an open-graded sub-base or another drainage specification. Match the material to the site and drainage plan.
Do gravel grids replace the sub-base?
No. A stabilisation grid holds the surface gravel in position, but it still needs a correctly prepared and compacted foundation underneath. Follow the grid manufacturer’s complete installation specification.
How do you stop gravel moving onto the pavement?
Use firm edge restraints and install a block, sett or kerb threshold across the driveway entrance. Keep the gravel slightly below the edging and rake loose stones back regularly.
Build the foundation before spreading the gravel
The visible gravel is only the final part of the driveway. Long-term performance depends on excavation, stable ground, geotextile separation, a compacted sub-base, secure edging and a working drainage route.
Use angular driveway gravel at a controlled depth and add stabilisation grids where turning vehicles, slopes or accessibility make movement more likely. A properly built foundation prevents most of the ruts, puddles and maintenance problems associated with poorly constructed gravel driveways.
Price Your Gravel Driveway
Calculate a UK estimate using the driveway size, existing surface, location and required extras.